
Krzysztof Kardach, Chief Technologist, Omni3D
One of the features that was a ‘game changer’ when Simplify3D entered the market was the ability to edit the supports manually. This allows the user to decide where to print the supports and where not to print them. This saves printing time and, for some models, enables correct printing at all.
However, manual editing of supports in Simplify3D has one big disadvantage. In order to add or remove a support in a specific area, the program requires a manual click on each of the pillars, which can be thousands. This drawback often makes it impossible to edit the supports over a larger print area.
Even faster support editing in Simplify3D
However, there is a solution to this problem. If we could simply simulate clicks at a much higher speed by software, we would just have to drive the mouse over the supports and the deletion/addition would be done automatically.
Thanks to a simple tool like AutoClicker, we can call up clicks at a high frequency.
How to start working with AutoClicker?
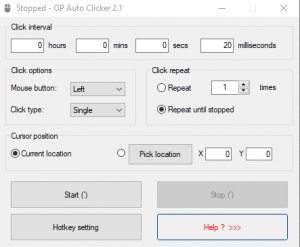
Download Auto Clicker a automation tool that lets you automate mouse clicks.
After opening the program, we can enter what time the click will be called. I suggest a value of 20 ms, which will cause 50 clicks per second. By selecting Hotkey setting, we can also select the key with which we will start and end the automatic click functions.
For the automatic click function to work well with Simplify3D we still need to change the mouse button assigned to rotate the 3D model view. By defaults, this is the left mouse button, which causes uncontrollable rotation of the view in the removal tact.
By entering from the toolbar in TOOLS > OPTIONS you can change the assigned keys. In my case, I changed to the mode used in Autodesk Fusion 360, i.e. Shift + center key for rotation and center key for panning view. Now, when you enter Manual Support Edit mode, then select Add or Remove mode and click on the AutoClicker assigned key – moving the mouse over the support performs the selected action.
See my tutorial on YouTube:
Simplify3D : Quick editing of support structures
Contact us or check our capabilities by ordering a 3D trial printout.